Yes, Schaeffler offers various training options for SmartCheck. More information on this can be found
here.
Can SmartCheck be used in areas where explosive atmospheres might occur (ATEX-zones)?
No, the SmartCheck is not certified for use in areas where explosive atmospheres might occur (ATEX-zones).
Can SmartCheck send emails triggered by certain events?
Yes, SmartCheck can be configured to send emails when certain events occur. For this, check the
manual.
Can I copy measurement configurations from one SmartCheck to another?
Yes, you can copy measurement configurations from one SmartCheck to another. You can download a configuration from one
SmartCheck via SmartWeb (File -> Save device configuration) and apply it to the next SmartCheck (File -> Upload device
configuration). The same can be achieved using the SmartUtility (Light) software, by downloading the configuration (More
actions -> Download configurations) and uploading it to the next device(s) (More actions -> Upload configurations).
Can I use the network cable to power the SmartCheck?
Yes, SmartCheck supports Power over Ethernet (PoE) according to the IEEE 802.3af Mode A standard. This allows the device
to receive both data and electrical power through a single Ethernet cable, simplifying installation and reducing the
need for additional power sources.
Do I have to purchase software to work with SmartCheck?
SmartWeb and SmartUtility Light are included in the
scope of supply. SmartUtility is a separate purchase. This is
needed for data analysis. A 60-days test version is available free of charge.
Do the M12 plug connectors on SmartCheck have a special coding?
No, they are standard M12 plug connectors. Only the M12 ethernet cable has a D coding.
How can I integrate data from SmartCheck into my software or infrastructure?
If you want to read data from SmartCheck to integrate them into your software or infrastructure, you have several options:
Receive data via email
Receive data via MQTT
Receive data via OPC/UA
For all three, we provide data of SmartCheck in a structured format, which you can easily parse and use in your software.
The data contains information about the device, its measurements, and its status. The data is provided in protobuf
format (not json!). We provide open-source tools to decode this data, which you can find on our
GitHub repository for the data converter tool.
More information on the data exchange with SmartCheck can be found in the document
Data exchange with ProLink.
How can I stay informed about new releases for SmartCheck?
You can get automatic notifications whenever new versions of SmartCheck are released. This way, you’ll always know when
new updates, manuals, or important information becomes available.
Look for the green feed symbol (it looks like a radio wave icon) next to “Latest news” and click on it
You will see a page with text that looks like code - don’t worry, this is normal
Copy the web address from your browser’s address bar. It should be: https://sls-cdn.schaeffler-iot.com/feed.xml
Getting the notifications:
Now you need a program that can read these notifications (called a “feed reader”). Some options:
Outlook (older versions only, not “Outlook new”): Open Outlook,right-click the RSS Feeds folder and choose “Add a
new RSS feed”, then paste the web address you copied. Note: Newer versions of Outlook do not support RSS feeds, so this
option is not available Outlook new.
Email programs with feed support: Look for an option to “Add RSS Feed” or “Subscribe to Feed” and paste the web
address
Browser extensions: Some web browsers have add-ons that can show you these updates
Feed reader apps: You can download free apps like Feedly or Inoreader, then add the web address there
Once set up, you’ll automatically receive notifications whenever something new is published.
How do I communicate with SmartCheck for configuration and data handling?
For the configuration of the SmartCheck, an internet browser is needed, which connects to the device’s SmartWeb via
Ethernet. For the data handling, also SmartUtility can be
used.
How do I contact support when I think I found a bug in the software?
When you have a problem with the SmartCheck device and think that this might be a bug in the software, then we highly
appreciate you to report this to us, so we can investigate and improve the SmartCheck firmware. On the top of this page,
you find the link to our technical support.
When you contact us, it really helps us when you provide the following information, depending on the use case:
Type and serial number of the device, i.e. mac address, printed on the label of the device
Hardware configuration
Connections to the outside world, e.g. is there a network connection, which protocols are used, which external signals
are connected to the device, etc
Version number of the components involved, e.g. firmware version number of the SmartCheck firmware, software version of
SmartUtility, if it is involved, etc. In the firmware, the version numbers are all listed in SmartWeb in the menu under
Help –> Version information. This table can be copied as text and then pasted into an email or support form
When the support requests more information, it is helpful to provide for example log files of the SmartCheck device, which
can be analysed by the support team and the developers to investigate the problem. There are 2 ways of downloading them:
While in SmartWeb, change the URL in the browser to <IP address>/debug_info.scr and press <enter>.
Open the maintenance system of the SmartCheck device, e.g. restarting the device and reloading the browser several times
until the maintenance system is shown. Then enter the maintenance system by clicking on the icon and then click on the
icon “Download debug log files”, then click on the symbol.
Both will download an encrypted package of all log files in the system, which can only be unpacked by Schaeffler support
and R&D to investigate the issue. Some virus scanners will not allow this file type to be sent. In this case, either use
a shared drive like OneDrive or Google Drive to send the file, or just rename the extension from .scr to .txt. Since the
file is an encrypted .tar.gz file, and only contains log files in text form, this poses no security risk to anyone.
How do I figure out the IP address of my SmartCheck?
The device can get its IP address in one of three ways:
Automatically from a DHCP server on your network.
If set to DHCP, but no DHCP server is found, it will assign itself the default address of 192.168.1.100.
Manually assigned by you.
If you do not know the IP address of your device, you can try the following methods to find it:
Use the SmartUtility (Light) software, which can scan your network and find the device. This uses a UDP broadcast to
locate the device. On modern company-managed computers, this might not be allowed due to firewall settings. Then
SmartUtility will not find any device. But even if the firewall allows the broadcast, it might not find the device if
in a different network section. Network switches might block broadcasts between different sections. (see the
IT security information document for more information on needed
ports in the firewall).
Check your DHCP server’s client list to see if the device has been assigned an IP address.
Try the default IP address of 192.168.1.100.
If these measures do not work, it will become much more difficult to find the device. You might need to log the network
traffic in the hope that the device is configured to access external network resources. In this case it makes sense to
use a network sniffer tool like Wireshark to log all network traffic and then filter for the MAC address of the device.
The MAC address is printed on a label on the device. Or if you know that devices in your network are usually configured
to a certain IP range, you can write a script to ping all addresses in that range and see which ones respond.
Another tip is to use a PC or laptop which is not managed by the company IT. Such a PC is more likely to have less
restrictive firewall settings and might be able to find the SmartCheck using the SmartUtility (Light) software. You can
connect this PC directly to the same network as the SmartCheck and run the SmartUtility (Light) to see if it can find
the device’s IP address. Now you can change the IP address of the device to something more suitable for your network, or
to DHCP, and then connect it to your company-managed computer.
How do I figure out the MAC address of my SmartCheck?
There are three ways to find the MAC address:
You’ll find a label on the device itself
With Smartweb (Help -> Version information -> Serial number)
In SmartUtility, when you search for devices
The MAC address is equal to the serial number of the device.
How do I interpret the status words used in external channels?
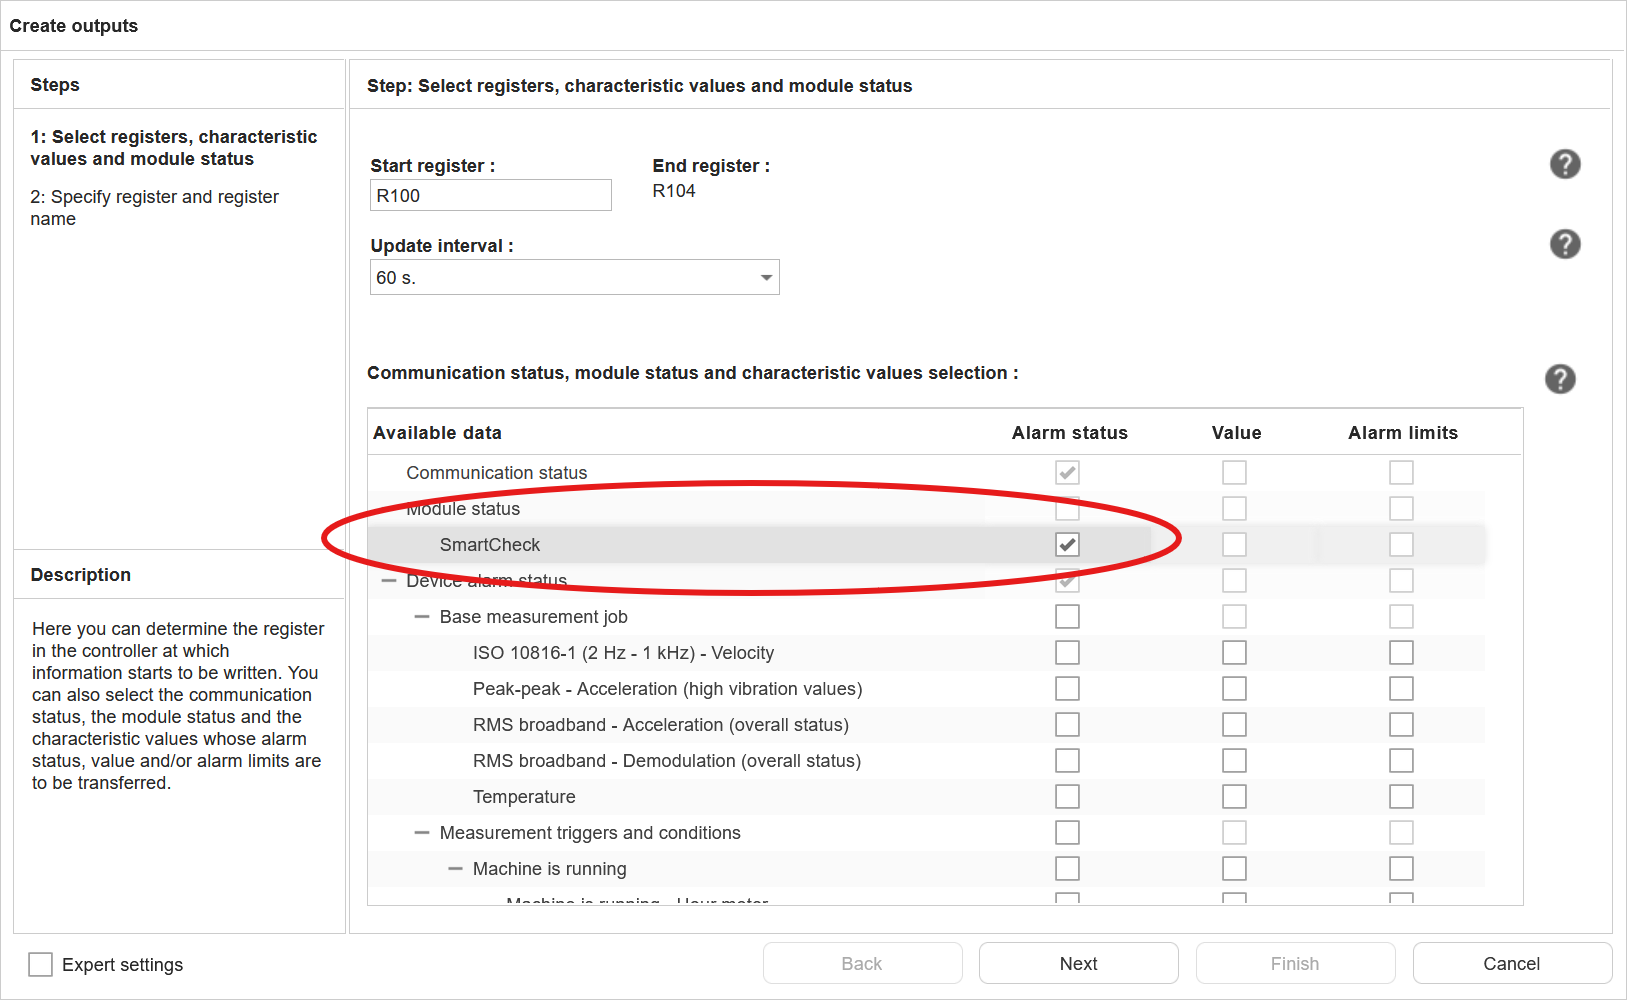
As user, you can add the (alarm) status of measurement jobs and characteristic values to the output of external
fieldbus channel (SLMP).
Measurement job and characteristic value status word:
The status words for the measurement jobs and characteristic values are 16-bit values, with the following values:
Alarm state value
Meaning
0
undefined
1
no alarm
2
pre alarm
3
main alarm
4
error
SmartCheck status
The SmartCheck status word is a 32-bit value, where some of the bits represent a specific status or condition.
Bit position
31 (MSB)
30-7
6
5
4
3
2
1
0 (LSB)
Meaning
MS
-
DO
AO
DI
AI2
AI1
T
V
Abbreviation
Meaning
Values
MS
Module Status
0: OK; 1: error
DO
Digital output status
0: OK; 1: error
AO
Analogue output status
0: OK; 1: error
DI
Digital input status
0: OK; 1: error
AI1-2
Analogue input status
0: OK; 1: error
T
Temperature sensor status
0: OK; 1: error
V
Vibration sensor status
0: OK; 1: error
How do I use TLS (SSL) certificates with SmartCheck?
SmartCheck offers several features that require secure, encrypted communication. The following protocols and features in
SmartCheck use certificates:
OPTIME: SmartCheck uses TLS for secure communication with the OPTIME cloud platform. This certificate is automatically
installed during onboarding to OPTIME.
MQTT: SmartCheck can use TLS for secure MQTT communication with an MQTT broker.
HTTPS: SmartCheck’s SmartWeb interface and the status webservice use HTTPS for secure communication.
OPC/UA: SmartCheck can use TLS for secure OPC UA communication with an OPC UA client.
MQTT
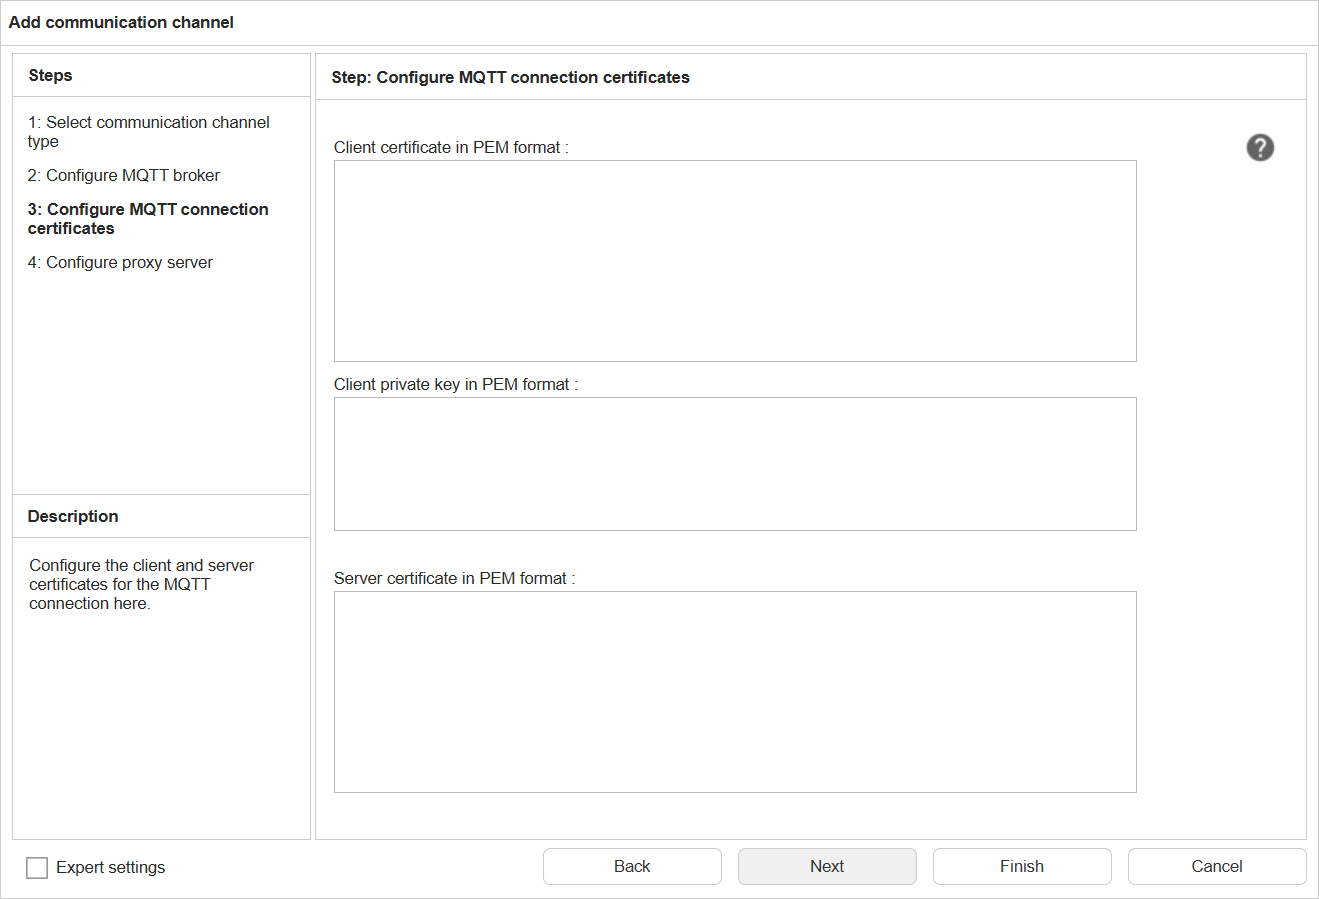
MQTT uses its own certificates for secure communication. To use your own certificates for MQTT, you will need to import
them into the device. For each MQTT-connection, you can add your own set of certificates. In SmartWeb, select the
configuration screen, select Communication Channels -> Add -> MQTT and enter the data on the first configuration screen.
Then click next to the following configuration screen:
Here you can upload the following:
Field
Description
Client certificate
The client certificate used for MQTT communication. This certificate is used to authenticate the device to the MQTT broker.
Client private key
The private key corresponding to the client certificate. This key is used for authentication and encryption in MQTT communication.
Server certificate
The server certificate used to verify the MQTT broker’s identity by SmartCheck. This certificate is used to ensure that the device is communicating with a trusted MQTT broker.
HTTPS and OPC UA
HTTPS and OPC/UA share the same SSL certificate for secure communication. By default, a self-signed certificate is
installed in the factory to be used by HTTPS and OPC UA communication. However, you can also use your own TLS
certificate, such as one issued by a trusted certificate authority (CA), to enhance security and ensure that your
communication is trusted by clients.
To use your own certificate, you will need to import it into the device. For this, reboot into the maintenance system
(in SmartWeb, click on Help -> Select device restart -> Start the device’s Maintenance System). Then enter the
maintenance system, click on “Adjust system settings” and then on “Replace server certificate (PEM)”. Details on this
can be found in the user manual
When using this certificate also for OPC UA, on creation of the certificate, you need to set the following “alternative
subject”: “URI:urn:schaeffler:cms”
IMPORTANT: SmartCheck currently only supports RSA certificates. DSA or elliptic curve are not supported.
In the uploaded file, both the certificate and the private key must be included in PEM format. Both can be copied in the
same file, with the private key first, followed by the certificate. An example of the file content is shown below:
How much data can I store before the memory of the SmartCheck is full?
For as long as there is free memory available, all measurement data is stored in the internal flash memory of the
SmartCheck device. When there is only 5MB of free memory left, the system starts to delete the oldest measurement data to
free up space for new data. But is does this in an intelligent manner, by removing single measurement points from
historical data, for example by removing hourly measurements and keep only one measurement per day. The longer back in
history, the fewer data points are kept. This way, the system can store data for a very long time, even with limited
memory.
Is it possible to download data or configurations from SmartCheck using SmartUtility Light?
SmartUtility Light can download data and
configurations, as well as upload configurations.
My SmartCheck has the wrong time. How can I fix this?
The SmartCheck device has an internal clock, which can drift over time, since its accuracy is depending on many factors
like the temperature for example. Additionally, the system time can be off after a power-down of the system. To always
have the correct time on the device, it can use a time-server using the network time protocol (NTP). See the
manual on how to configure this. Ask your IT department for the address of this
server.
What are the keys on the SmartCheck for and how can I use them?
SmartCheck has 2 keys for resetting the device and starting the learning mode. The manual
describes how to activate or deactivate these functions.
If you want to operate the keys on the SmartCheck device, you must first deactivate the key lock. Press the Reset key
and then press the Teach key within 2 seconds. The LED between the keys flashes to confirm. After 2 minutes, the key
lock is automatically reactivated. The LED between the keys then goes out again.
What happens if the power supply of the SmartCheck is interrupted?
SmartCheck stores all configurations directly in non-volatile memory. Measured data is cached for up to 5 minutes, before
it is written to non-volatile memory, so worst-case measurement data of the last 5 minutes may be lost in case of a
power loss. The internal real time clock (RTC) of the SmartCheck is buffered, when an external buffer supply is connected.
If not, the internal RTC will reset to the last time of any event stored in the non-volatile memory, e.g. the last time
a measurement was stored. This may lead to incorrect timestamps for measurements after the power loss, until the RTC is
synchronized again, e.g. via NTP or by setting the device manually to the correct time.
The measurements will continue as soon as the power supply is restored, and the SmartCheck will automatically reconnect to
the network and to the configured data exchange targets.
What happens to my network settings if I use "Restore factory default settings" on SmartCheck?
If you use “Restore factory default settings”, no changes will be made to your own network settings. This is to prevent
losing the network connection to the device.
Why is it important to update the firmware of my SmartCheck and how do I get updates?
The firmware of the SmartCheck device is improved over time. Certainly it is a valid strategy not to update the firmware
of the SmartCheck device in the field. Never change a running system, right? However, updating has several benefits:
New features can greatly improve the benefit of the device, for example with new analysis methods or more
configuration possibilities.
As with any complex software, also the firmware of the SmartCheck device contains bugs which slipped the quality
assurance measures before the release of a new version. In new firmware versions, bugs which are found internally or
reported by customers are fixed.
The firmware can have IT security issues, which will be fixed after they are reported, for example in the open-source
components used in the firmware. More information on this can be found in the
on IT security information
document on this page.
Updates are always published on this page. For each new firmware version, we also provide the release notes, which
explain in detail which changes were made to the firmware.
If you are using the SmartUtility software software or
SmartUtility Light software software on your PC, you will be informed automatically
whenever a new firmware version for your devices is available.